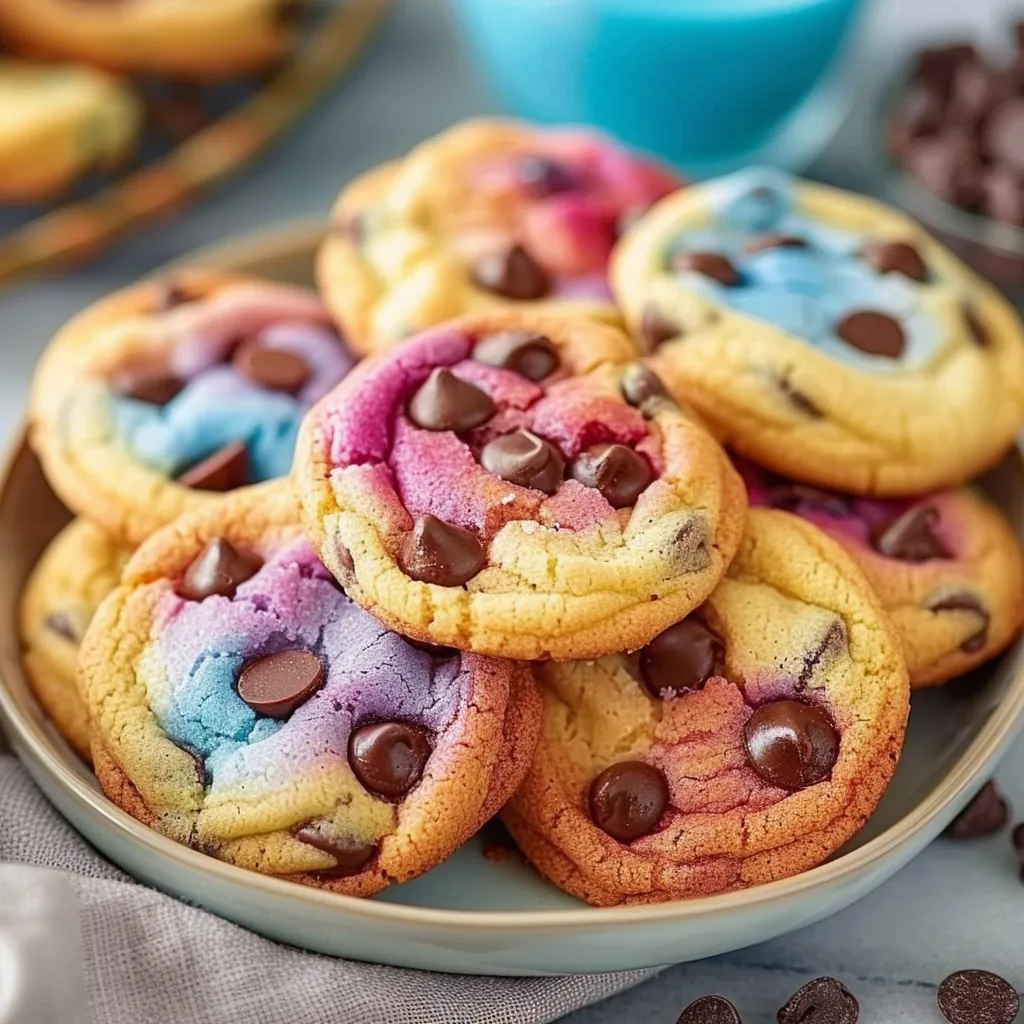
Ah, Easter! The arrival of spring brings with it the promise of sunny days, blooming flowers, and the sweet scent of chocolate wafting through the kitchen. Growing up, Easter was always a special time in my family. After a long week of waiting, we’d gather in the kitchen, armed with our aprons and a mix of excitement and a bit of frosting-smeared chaos. Our baking tradition? Chocolate chip cookies, of course—except these weren’t just any chocolate chip cookies. No, these were vividly decorated with a sprinkle of pastel colors and a hint of seasonal charm. They were the star of our Easter gatherings, surprising everyone with their chewy texture and warm, melting chocolate. Let me take you on a delicious journey to recreate these delightful Easter Chocolate Chip Cookies that surely deserve a place in your own holiday traditions.

Why You’ll Love This Recipe
Why should you give this recipe a try? Well, let’s be honest for a moment here: there’s nothing quite like the joy of a freshly baked cookie. This recipe is not just about providing a scrumptious treat—it’s also about the smiles that come with sharing warmth from your kitchen. You’ll find that these cookies are incredibly easy to whip up, making them perfect for busy evenings when you want to impress your loved ones without breaking a sweat. Plus, they taste like something you’d get from a high-end bakery but made right at home, inviting a cozy atmosphere. Every bite encapsulates the feeling of love and nostalgia. So grab your baking gear; let’s dive in!
What It Tastes Like
Imagine pulling one of these cookies from the oven. The warm, gooey chocolate chips slightly droop into a soft, buttery base that beckons you to take that first bite. The cookie itself gives way easily, as if it’s hugging your taste buds, making you feel a rush of comfort. It’s sweet, but the saltiness balances it perfectly, reminiscent of sitting on a sunny porch, laughter ringing in the air, a warm breeze wrapping around you like a favorite old sweater. These cookies exude a nostalgic charm, mingled with the delightful crunch of colorful sprinkles that provide a surprise in every bite—a true flavor experience that just shouts, “Spring is here!”
Ingredients You’ll Need
Here’s what you’ll need to bring these delightful cookies to life:
- 2 1/4 cups all-purpose flour: This forms the base, giving our cookies the perfect structure.
- 1/2 teaspoon baking soda: This little gem helps the cookies rise beautifully.
- 1/2 teaspoon salt: Balances the sweetness and enhances the flavors.
- 1 cup unsalted butter (softened): Adds richness and a creamy texture that makes these cookies melt in your mouth.
- 3/4 cup granulated sugar: Sweetens without overwhelming. A classic choice!
- 3/4 cup packed brown sugar: Deepens the flavor and leads to that irresistible chewiness.
- 1 teaspoon vanilla extract: A splash of sweetness—not just for cookies but for the heart.
- 2 large eggs: Binds everything together; plus, the extra egg yolk adds richness!
- 2 cups chocolate chips: Choose semi-sweet or dark—they’re the stars of the show!
- 1 cup festive sprinkles: Because who doesn’t love sprinkles to brighten up their day?
Optional Additions:
- Nuts: Chopped walnuts or pecans add a delightful crunch.
- Coconut flakes: For a tropical twist, sprinkle in some shredded coconut.
Special Garnishes:
- Colored sugar: A fantastic way to make your cookies pop even more!
Step-by-Step Instructions
Let’s get these cookies baked!
- Preheat your oven: To 350°F (175°C), allowing it to build up that perfect warmth before the cookies hit the trays.
- Mix the dry ingredients: In a bowl, whisk together the flour, baking soda, and salt. This is crucial for even distribution—don’t rush this step; it’s where the magic happens!
- Beat the butter and sugars: In a separate large bowl, cream together the softened butter, granulated sugar, and brown sugar until light and fluffy. This might take around 2-3 minutes; patience is key!
- Add eggs and vanilla: Beat in the eggs one at a time, then mix in that gorgeous vanilla extract. Your kitchen will now smell amazing, I promise!
- Combine dry and wet ingredients: Gradually incorporate your dry mixture into the wet. Mix until just combined—overmixing can lead to tough cookies! Remember, we want soft and chewy.
- Stir in the chocolate chips: Add those glorious chocolate morsels and fold them gently in. It’s like tucking them into a warm blanket!
- Fold in the sprinkles: Look at those colors! Make sure they’re evenly distributed; every cookie should feel festive.
- Drop dough onto baking sheets: Using a spoon or cookie scoop, drop rounds of dough onto a lined baking sheet, spacing them a couple of inches apart to give them room to spread.
- Bake: Pop the trays into the oven and bake for about 10-12 minutes, or until the edges are lightly golden. Don’t worry if they seem soft; they’ll firm up as they cool.
- Cool: Allow the cookies to sit on the sheet for a few minutes before transferring them to a wire rack to cool completely. Try not to eat them straight off the sheet—it’s really hard, I know!

Recipe Variations
If you’re feeling adventurous, there are many delicious twists to give these cookies new life!
- Mint Chocolate Chip Cookies: Swap in mint chocolate chips for a refreshing twist. It’s like biting into spring!
- Peanut Butter Swirls: Add dollops of peanut butter to the dough before baking to create beautiful swirls and extra flavor.
- Oatmeal Crunch: Mix in quick oats for added texture and a hearty bite.
Serving & Storage Tips
These cookies are best enjoyed warm, straight from the oven, but they also store beautifully! Here’s how:
- Storage: Keep your cookies in an airtight container at room temperature for up to a week. However, I’m pretty sure they won’t last that long!
- Freezing: You can freeze unbaked cookie dough balls on a baking sheet, then transfer them to a freezer-safe bag for up to three months. When you’re ready, bake them directly from the freezer, just add a couple of extra minutes to the baking time.
- Creative Leftovers: Crush up leftover cookies and use them as a topping for ice cream or mix into a yogurt parfait for extra crunch and sweetness!
Helpful Tips
- Measure your flour correctly: Too much flour can lead to dry cookies. Scoop it into your measuring cup and level it off for the perfect amount.
- Room temperature eggs and butter: Ensuring these ingredients are at room temperature will help them combine more smoothly, leading to a better texture.
- Don’t overbake: Remember, these cookies will continue to cook on the sheet after removal, so keep an eye on them during those last couple of minutes!
Special Equipment
- Baking sheets: A sturdy, good quality baking sheet is essential for even heat distribution, ensuring that your cookies bake perfectly.
- Parchment paper: This is a game-changer! It prevents sticking and makes cleanup a breeze.
- Cookie scoop: A diner-style scoop helps form even balls of dough so that all your cookies bake uniformly. Plus, it’s kind of fun to use!
Frequently Asked Questions
1. Can I make these cookies gluten-free?
Absolutely! Just swap the all-purpose flour with a 1:1 gluten-free blend, and you’re good to go!
2. How do I know when my cookies are done?
Look for slightly golden edges and tops that look just set. They may seem soft, but they’ll firm up as they cool!
3. Can I add nuts to my cookies?
Of course! Chopped walnuts or pecans complement chocolate beautifully and add an extra crunch.
4. How can I make these cookies dairy-free?
Substitute the butter with a dairy-free spread or coconut oil, and use dairy-free chocolate chips!
Conclusion
There you have it—your very own Easter Chocolate Chip Cookies, infused with love, memory, and a sprinkle of fun. Every time I whip up a batch, I’m transported back to those joyful family moments spent in the warmth of the kitchen, laughter echoing around as we waited for the cookies to cool. I love serving these to friends, kids, or simply enjoying them myself with a cup of coffee on a quiet morning. If you decide to try this recipe, I’d love to hear all about how they turn out for you—don’t hold back! Share your stories and cookie adaptations in the comments below. Happy baking and a joyous Easter!
Print
easter chocolate chip cookies
- Total Time: 27 minutes
- Yield: 24 cookies 1x
Description
Savor your holiday with these delightful Easter chocolate chip cookies. Perfect for celebrations, they will be a hit with family and friends alike.
Ingredients
Instructions
Notes
Recreate delightful Easter Chocolate Chip Cookies that are vividly decorated and deliver a nostalgic flavor experience.
- Prep Time: 15 minutes
- Cook Time: 12 minutes
- Category: Dessert
- Cuisine: American
Nutrition
- Serving Size: 24 cookies
- Calories: 150
- Sugar: 10g
- Fat: 7g
- Carbohydrates: 22g
- Fiber: 0.5g
- Protein: 2g