When it comes to Halloween, there’s something truly magical about the decorations, the crisp autumn air, and of course, the treats that fill our tables. One afternoon, while sipping on my pumpkin spice latte, I reminisced about those enchanting nights filled with laughter, costumes, and sugar highs from homemade goodies. It was during a particularly spirited Halloween gathering that my friend Angela pulled out a platter of cookies that would soon become a staple of our celebrations: Witch Hat Halloween Cookies. Each bite was a delightful blend of chocolate and frosting, and the whimsical presentation brought smiles that snapped me straight back to my childhood. These cookies aren’t just a treat; they’re a celebration of fun and creativity. Let’s conjure up a batch, shall we?
Why You’ll Love This Recipe
Picture this: a classic cookie with a twist that steals the show, making it the star at your Halloween festivities. These Witch Hat Cookies are not just simple to make—they are also an absolute joy to decorate, whether you’re baking with little helpers or crafting a spooky masterpiece solo. The best part? They are delightfully tasty, making them perfect for sharing (or hoarding!). This treat is like a warm hug in cookie form, and who doesn’t need that this time of year?
What It Tastes Like
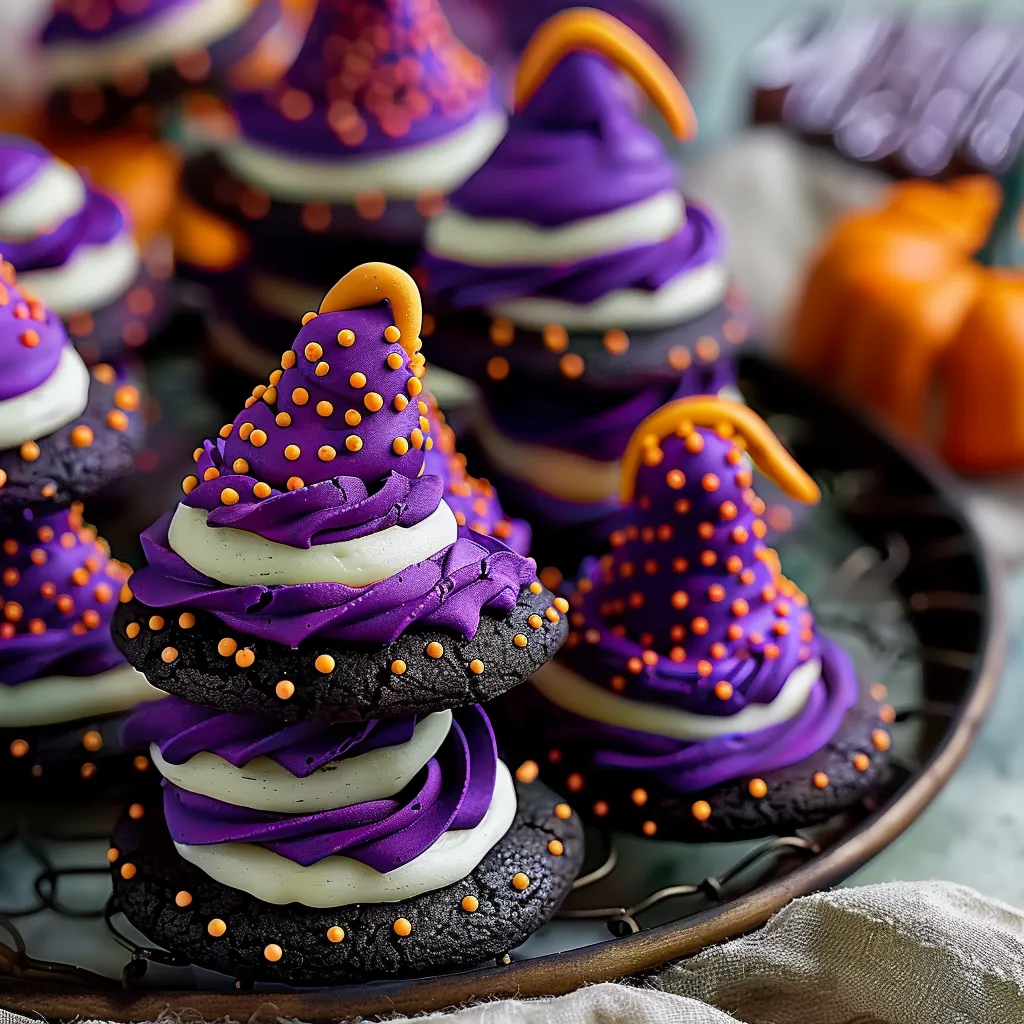
Imagine biting into a soft cookie with the rich flavor of chocolate complemented by the creamy sweetness of frosting, all topped with a crunchy candy “hat.” The combination of textures—from the tender cookie to the velvety frosting and the crispy chocolate kisses—creates a delightful experience for your taste buds. It’s like that comforting feeling you get while wrapping up in a cozy blanket on a chilly fall evening. Each cookie is not just a treat but an experience, evoking the spirit of Halloween with every delicious bite.
Ingredients You’ll Need
- 1 cup unsalted butter, softened: This adds a creamy richness that forms the base of the cookies.
- 1 cup granulated sugar: Sweetens the deal and helps create that delightful cookie texture.
- 1 cup brown sugar, packed: Gives a deep, caramel-like flavor that’s hard to resist.
- 2 large eggs: Binds the mixture together and adds moisture.
- 1 teaspoon vanilla extract: A must for that aromatic warmth in every bite.
- 3 cups all-purpose flour: The foundation for a sturdy yet soft cookie.
- 1 teaspoon baking soda: Helps the cookies rise nicely for that perfect softness.
- 1 teaspoon salt: Balances the sweetness and enhances the flavor.
- 1 cup cocoa powder: This is where the chocolatey goodness comes into play.
- Chocolate kisses (or other chocolate candies): These will be our “witch hats” on top of the cookies.
- Frosting (store-bought or homemade): For decorating, this adds that spooky flair.
Optional Additions:
- Sprinkles in Halloween colors
- Different types of chocolate candies to create a medley of hats
Special Garnishes:
- Edible glitter for a mystical touch
- Candy corn for a festive addition

Step-by-Step Instructions
- Preheat the Oven: Start by preheating your oven to 350°F (175°C). This ensures our cookies bake evenly.
- Cream the Butter and Sugars: In a large bowl, beat together the softened butter, granulated sugar, and brown sugar until light and fluffy. This step is where the magic begins, so don’t rush it!
- Add the Eggs and Vanilla: Once your butter and sugars are well-combined, add the eggs one at a time, mixing well after each addition. Then stir in the vanilla extract.
- Combine Dry Ingredients: In a separate bowl, mix together the flour, cocoa powder, baking soda, and salt. Gradually add this mixture into your wet ingredients, stirring until fully incorporated.
- Shape the Cookies: Roll the dough into small balls (about two tablespoons each) and place them on a lined baking sheet, spacing them about two inches apart.
- Bake: Pop the baking sheet in the oven and bake for about 10-12 minutes. You want the edges to be set but the centers to remain soft.
- Add the Chocolate Kisses: As soon as they come out of the oven, gently press a chocolate kiss into the center of each cookie. Let them cool for a few minutes on the baking sheet before transferring them to a wire rack to cool completely.
- Frost: Once the cookies are cool, it’s time to decorate! Use a piping bag (or just a simple spoon) to add your frosting around the base of the chocolate kiss, creating a hat effect.
- Add Garnishes: If you’re feeling extra festive, sprinkle on some edible glitter or Halloween sprinkles to make those hats really pop!
Recipe Variations
If you want to switch things up, try using peanut butter or white chocolate Kisses instead of regular ones for a different flavor. Or, you could mix in some crushed candy bar pieces into your dough to make a delicious twist. Feel free to experiment with the frosting colors as well—how about orange or purple for a spookier vibe?
Serving & Storage Tips
These cookies are best enjoyed fresh, but they can be stored in an airtight container at room temperature for up to a week. If you have any leftovers (which is rare!), try crumbling them over some vanilla ice cream for a fun fall dessert. Trust me, it’s a game changer!
Helpful Tips
A couple of things I’ve learned along the way: be careful not to overbake the cookies! You want that nice, soft center to remain. If your dough is too sticky, you can chill it in the fridge for about 30 minutes before rolling it into balls. Also, don’t hesitate to let the kids join in on the decorating—everyone loves involving a little creative chaos, especially around Halloween!
Special Equipment
- Baking Sheet: A good, sturdy baking sheet ensures even cooking and prevents warping, giving your cookies that perfect shape.
- Parchment Paper: This makes cleanup so easy and prevents sticking—no one wants a cookie casualty, right?
- Piping Bags: While you can use a simple spoon to frost, piping bags let you get fancy and create those delightful swirls.

FAQ
Can I make these cookies ahead of time?
Absolutely! You can make the cookie dough in advance and refrigerate it for up to three days before baking. Just let it sit at room temperature for about 10-15 minutes before shaping to make it easier to handle.
What if I don’t have chocolate kisses?
No worries! You can use any chocolate candy that fits the theme, like mini Reese’s cups or even chocolate-covered marshmallows. Be creative!
Can I freeze the cookies?
Yes! Once the cookies have completely cooled, you can freeze them in an airtight container for up to three months. Just let them thaw at room temperature, and they’ll be as good as new!
Why are my cookies flat?
A common culprit for flat cookies is melted butter or too much sugar. Make sure your butter is softened but not melted, and always measure accurately!
How can I make these cookies gluten-free?
You can use a 1:1 gluten-free flour blend instead of all-purpose flour. Just check your other ingredients for any hidden gluten, especially the baking powder.
Conclusion
These Witch Hat Halloween Cookies have become a cherished part of my Halloween traditions, invoking laughter and creativity every time we bake them. There’s nothing quite like the joy of seeing friends and family’s faces light up as they take their first bite. Whether you’re baking for a festive gathering or just want a little something sweet with your coffee, I truly hope you’ll give them a try. And remember, each cookie has its own little personality, so let them express it however they want! Share your stories or versions in the comments below—I can’t wait to hear about your Halloween baking adventures!
Print
Delicious Witch Hat Halloween Cookies Spooktacular Treats
- Total Time: 32 minutes
- Yield: 24 cookies 1x
Description
Bake magical Witch Hat Halloween Cookies for a spooktacular fest Discover easy recipes to enchant your holiday treats Enjoy the fun 153 chars
Ingredients
Instructions
- Prep Time: 20 minutes
- Cook Time: 12 minutes
- Category: Dessert
- Method: Bake
- Cuisine: American
Nutrition
- Calories: 120 calories
- Sugar: 8 grams
- Sodium: 1 teaspoon
- Fat: 6 grams
- Carbohydrates: 15 grams
- Fiber: 0 grams
- Protein: 2 grams


