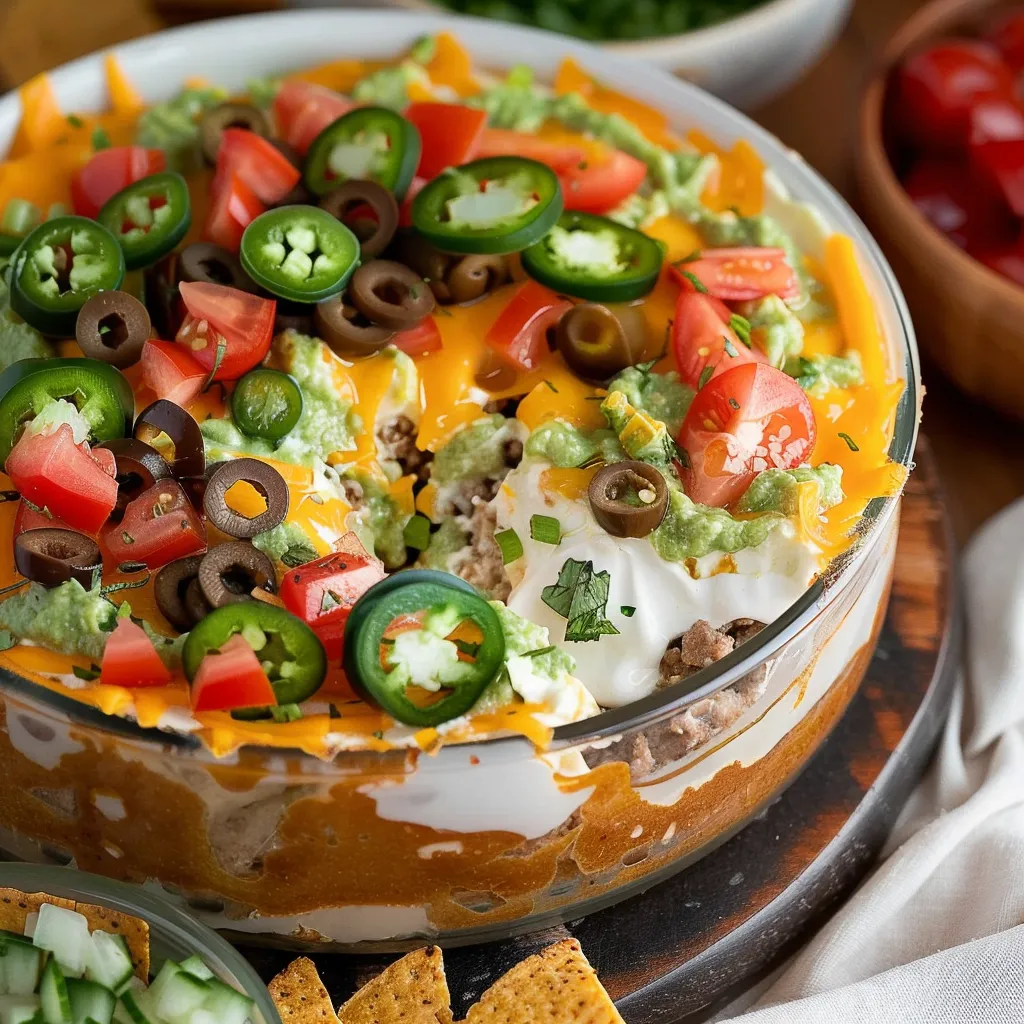
Picture this: a cozy gathering with friends, laughter echoing in the air, and the tantalizing aroma of a spicy, cheesy creation wafting through the kitchen. As we plop down on the couch with our plates loaded with chips and a vibrant rainbow of flavors, the simple joy of sharing food comes to life. The 7 Layer Dip is a classic party favorite that never fails to impress and brings smiles to faces, young and old alike. The layers glisten invitingly, beckoning you to dig in—a dance of textures and tastes that’s as delightful to serve as it is to enjoy.
This dish first danced its way into my life during a friend’s game night several years ago. Something about the camaraderie paired with delicious food ignited a passion in me to create my own version of this crowd-pleaser. The beauty of this dip lies not just in its stunning appearance but in its versatility and simplicity; it’s truly a dish that everyone can tailor to their own tastes—or just finish alone when nobody’s watching! Trust me, after one bite, you’ll know exactly why it has such a special place in my heart and, probably, in your recipe book too.
Why You’ll Love This Recipe
Now, let me spill the beans on why you should whip up this 7 Layer Dip. First off, it’s a total time-saver. With everything layered in a single dish, there’s minimal clean-up involved—no one wants to spend more time washing dishes than enjoying good company, right? Plus, it brings the flavor of your favorite Mexican restaurant right to your kitchen, without the hefty price tag. And let’s be honest, who doesn’t love a dish that makes you feel like a culinary genius without requiring hours of cooking?
This dip is more than just a pretty face; it brings layers of flavor that dance together beautifully. Creamy, cool, tangy, spicy, and crunchy, each bite delivers a little something special that will have your friends and family fighting over the last chip. It’s the kind of dish that invites conversation over the table, and hey, it pairs splendidly with any movie or game night.
What It Tastes Like
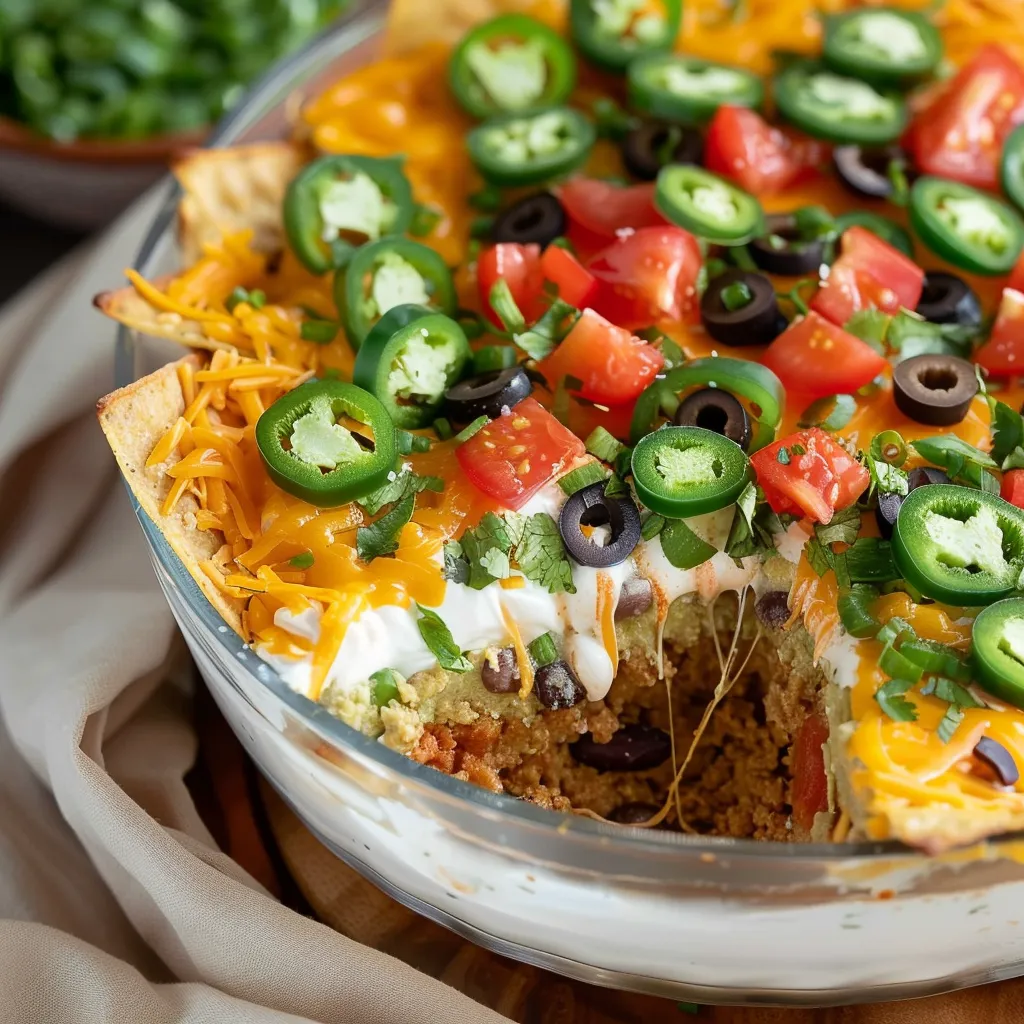
Ah, the flavors! Imagine diving into a mountain of layers that start off with a silky smooth base of refried beans. It has that hearty, earthy quality that gives a satisfying warmth, not unlike a hug after a long day. Then comes the cool, creamy sour cream that balances the beans just right, like the perfect foamy head on a freshly poured beer. As you go deeper, the taco seasoning adds a punchy zest, while the layers of guacamole bring a refreshing burst of brightness that dances on your palette, reminiscent of a sunny afternoon picnic.
The tangy salsa, with its juicy tomatoes and crunchy onions, mingles with the mixture, adding that extra zing that wakes up your taste buds. Finally, some shredded cheese and sliced olives atop it all melt together for a fulfilling finish, like softly wrapping a cozy blanket around you as you sink into the couch. Each layer feels like a celebration—bringing comfort, joy, and a sprinkling of party spirit that leaves you yearning for just one more bite.
Ingredients You’ll Need
- Refried beans (1 can, 16 oz): The comforting heart of the dip, adding both creaminess and protein.
- Taco seasoning (1 packet, about 1 oz): A flavor blitz that enhances everything—a fiesta in every bite!
- Sour cream (1 cup): This brings a cool, tangy layer that balances the spices perfectly.
- Guacamole (1 cup): Adds richness and that lovely avocado goodness we all crave.
- Salsa (1 cup): Kick things up a notch with vibrant color and texture, ensuring each bite is juicy.
- Shredded cheese (1 cup, such as cheddar or Mexican blend): Melty goodness and a golden crown for your dip.
- Sliced black olives (1/2 cup): Salty, briny perfection and a delightful touch for decoration.
Optional Additions:
- Diced jalapeños: For a spicy kick.
- Chopped cilantro: A pop of freshness.
- Chopped green onions: Bright and zesty.
- Corn kernels: For an extra crunch and sweetness.
Special Garnishes:
- Chopped fresh cilantro: For a burst of color.
- Extra cheese: Because can you really have too much cheese?
Step-by-Step Instructions
- Prep your work area: Clear a space on your counter for your ingredients. Trust me, this little organization step makes a world of difference.
- Layer the refried beans: Open that can and spread the beans evenly across the bottom of your serving dish, as if you’re creating a comfy blanket for all the other layers. A spatula works wonderfully for this!
- Mix in the taco seasoning: Combine the taco seasoning with some water (as per packet instructions) and pour it over the refried beans. Don’t rush this step—it’s where the magic happens! Smooth it out evenly.
- Sour cream layer: Next, dollop the sour cream over the seasoned beans—just be careful not to disrupt the layers below. Spread it gently for a pleasing look.
- Add guacamole: Live your best avocado life and scoop your lovely guacamole right on top of the sour cream. Feel free to go a little heavy here; no one will complain!
- Top with salsa: Simply pour the salsa over your guacamole layer; don’t spread it too much—let those flavors meld during serving.
- Cheese, please: Sprinkle the shredded cheese on next, creating a cheesy crown atop your masterpiece.
- Finish with olives: Finally, garnish with those sliced black olives. They add the finishing touch, paving the way for festive excitement.
Recipe Variations
Want to get creative? You absolutely can! Try rolling this dip up in tortillas for tasty pinwheels or serving it in individual cups for a more styled presentation. Veggie lovers might enjoy adding chopped bell peppers or corn for texture. You can even shift the flavors entirely by swapping out the beans for white bean puree or the taco seasoning for a spicy curry blend. The possibilities are practically endless, and I’d love to hear how you mix things up!
Serving & Storage Tips
This dip is best served immediately, showcasing its beautiful layers. However, if you have leftovers, cover the dish tightly and store it in the fridge for up to three days—though, let’s be honest, it might not last that long! For reheating, it’s best to scoop out portions and warm them gently in the microwave, layering back together afterward for that fresh-off-the-table vibe.
As for creative leftovers? Slather the dip on a tortilla, roll it up for a quick lunch, or mix it in with scrambled eggs for a flavorful breakfast treat. Talk about the gift that keeps giving!
Helpful Tips
Now, here are a few pieces of sage advice I’ve gathered over the years that might save you some headaches. First, don’t rush the layering process—taking your time makes all the difference in the presentation. Also, if you want to make this dish ahead of time, prep the layers separately and assemble it no more than a couple of hours before serving to keep it fresh. Finally, resist the urge to leave out the olives—they add that extra touch of salty goodness. A missed olive layer is a sad layer!
Special Equipment
- Serving dish: Choose a clear glass or ceramic dish to showcase those beautiful layers—after all, you eat with your eyes first!
- Spatula: A nice, flat spatula or an offset spatula works wonders for spreading and smoothing out layers without disrupting the ones below.
Frequently Asked Questions
Can I make this dip vegetarian or vegan?
Absolutely! Substitute the sour cream with vegan sour cream or cashew cream and use refried beans without lard for a delicious vegetarian or vegan option. The flavors will still shine!
How do I prevent the guacamole from turning brown?
The trick to keeping your guacamole fresh is to press plastic wrap directly onto the surface before covering the dip. This helps reduce air exposure, which is the culprit of brown avocado!
Can I freeze 7 Layer Dip?
I don’t recommend freezing it, as the texture of some ingredients, like sour cream and guacamole, may suffer. However, you can certainly prepare the layers ahead of time (minus the guacamole) and assemble before serving.
What can I serve with 7 Layer Dip?
The classics like tortilla chips, pita chips, or veggie sticks work perfectly. You can also try it with mini tacos or crispy nachos for an impressive twist!
How can I spice it up?
If you like extra heat, toss in some diced jalapeños or use spicy salsa. You could even swap the taco seasoning for something spicier if you’re feeling adventurous!
Conclusion
As I write this, I can almost hear the crunch of the chips and feel the laughter of friends echoing around me. The 7 Layer Dip is more than just food; it’s a beautiful reminder of the simple pleasures in life—the joy of good company, laughter, and of course, scrumptious eats. Whether it’s game day, a festive gathering, or just a quiet night in, this dip is the perfect partner for any occasion. I can’t wait for you to try it; let me know how it turns out or share your stories in the comments! Here’s to many more cozy moments spent enjoying good food and great company!
Print
Savory 7 Layer Dip Recipe for Epic Game Day Parties
- Total Time: 20 minutes
- Yield: 8 servings 1x
Description
Delicious 7 layer dip recipe perfect for game day parties. Easy to make and sure to impress your guests with flavorful layers. Perfect for sharing!
Ingredients
Instructions
Notes
A classic party favorite that brings smiles to faces with layers of flavor and textures in a single dish, ideal for gatherings and celebrations.
- Prep Time: 20 minutes
- Category: Appetizer
- Cuisine: Mexican
Nutrition
- Serving Size: 8 servings
- Calories: 250
- Sugar: 2g
- Fat: 15g
- Carbohydrates: 22g
- Fiber: 5g
- Protein: 8g